
A Home Assistant integration for Viessmann heating controllers, heat pumps and boilers, over the Optolink optical service port, using an ESP32 running stock ESPHome as the bridge.
Not affiliated with Viessmann. This is an independent project, built and maintained by the community. It is not endorsed by, sponsored by or connected with Viessmann in any way, and nothing here is official. Viessmann, Vitocal, Vitotronic, Vitodens and Optolink are trademarks of their respective owners and appear here only to say which equipment this software talks to. No warranty of any kind; you use it at your own risk, on your own equipment.
It is catalog-driven rather than hand-maintained. Instead of a curated list of memory addresses per model, it reads a catalog describing your controller, works out which unit it is actually talking to, and builds the entity set for that one: names, units, scaling, enumerations, fault texts and weekly programmes all come from the catalog. The catalog is not part of this repository; you build it yourself, once, in a few minutes.
Status: beta. Two controllers have been confirmed on real hardware: a Vitocal heat pump with a Vitotronic 200 WO1A over P300 (the development unit, with Home Assistant 2026.9 and ESPHome 2026.8), and a Vitotronic 200 KW2 over the older KW protocol, reported working by a user with the full entity set. Other controllers are described by the same definitions and should work the same way, but have not been seen on a physical unit yet; see Protocols. Reports are welcome, whether they work or not.
| Controller | A Viessmann controller with an Optolink port (the round optical window on the front). Vitotronic 200/300 families, Vitocal heat pumps, Vitodens and Vitocrossal boilers among others. |
| Optolink adapter | An IR read/write head for that port. Self-built adapters are common; anything that presents the port as a 4800 baud, 8 data bits, even parity, 2 stop bits serial line works. |
| Bridge | An ESP32 running stock ESPHome 2026.3 or newer with the built-in serial_proxy component (still marked experimental by ESPHome). No custom firmware component is needed: the ESP relays raw bytes and nothing else, the whole protocol lives in Home Assistant. |
| Home Assistant | 2026.9 or newer, with the ESPHome integration set up for that node. OptoV opens the serial proxy through Home Assistant's own serial layer, which reports a node that went away only from 2026.9 on. |
| Catalog | Built once for your controller with VExtractor, see The catalog. |
Through HACS (recommended). Add this repository as a custom repository of type Integration, install OptoV, and restart Home Assistant.
By hand. Copy custom_components/optov/ into your Home Assistant
config/custom_components/ directory and restart.
-
Flash the ESP32 with a node like the one below, adjust the pins to your adapter, and add it to Home Assistant's ESPHome integration as usual. Keep the adapter off the ESP32's own
TX/RXpins; details, several ports on one node and why the names matter are in ESPHome configuration.esphome: name: optolink esp32: board: esp32dev api: encryption: key: !secret api_encryption_key wifi: ssid: !secret wifi_ssid password: !secret wifi_password uart: id: optolink_uart tx_pin: GPIO17 rx_pin: GPIO16 baud_rate: 4800 data_bits: 8 parity: EVEN stop_bits: 2 serial_proxy: - id: optolink name: "Optolink" port_type: TTL uart_id: optolink_uart
-
Build the catalog with VExtractor: download, run, answer two questions. What comes back is one
.dbfile. See The catalog. -
Add the integration under Settings → Devices & services → Add integration. The port list is Home Assistant's own and shows the serial proxies of every ESPHome node, along with whatever already uses one. Pick the port wired to the controller: nothing in the ESPHome API says which that is, so the choice is yours, and a wrong one simply fails to start with "controller not reachable". A proxy serves exactly one client, so do not pick one that is already in use. For a node Home Assistant does not have, choose Enter manually and type its address; its API key is then asked for. Setup then asks you to upload the catalog.
-
Done. The first poll identifies the controller and builds its entities. What the controller shows on its own display is enabled; everything else exists as a disabled entity until you switch it on.
Removing. Delete the entry under Settings → Devices & services; its entities, devices, dashboard resource and catalog file go with it (keep your own copy of the catalog). Uninstall through HACS afterwards and restart once more.
- The right entity set for your exact controller variant, identified from what the unit reports, not from a model list.
- Readings and controls from the catalog: temperatures, states, setpoints, operating modes, party and eco mode, heating curve, weekly programmes. Several hundred more behind the tiers in the options, for a debugging session.
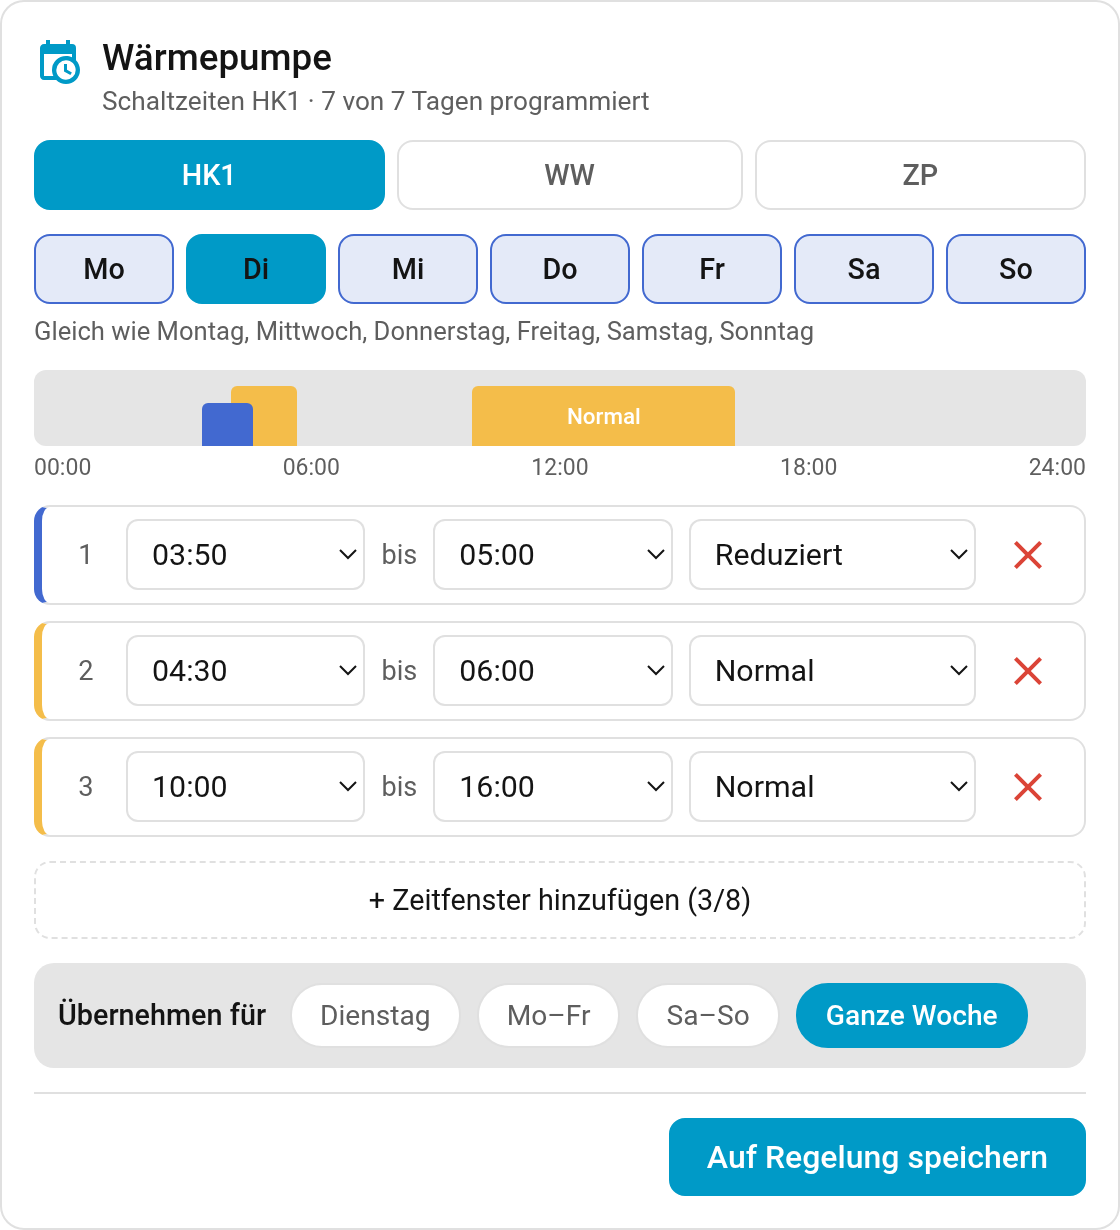
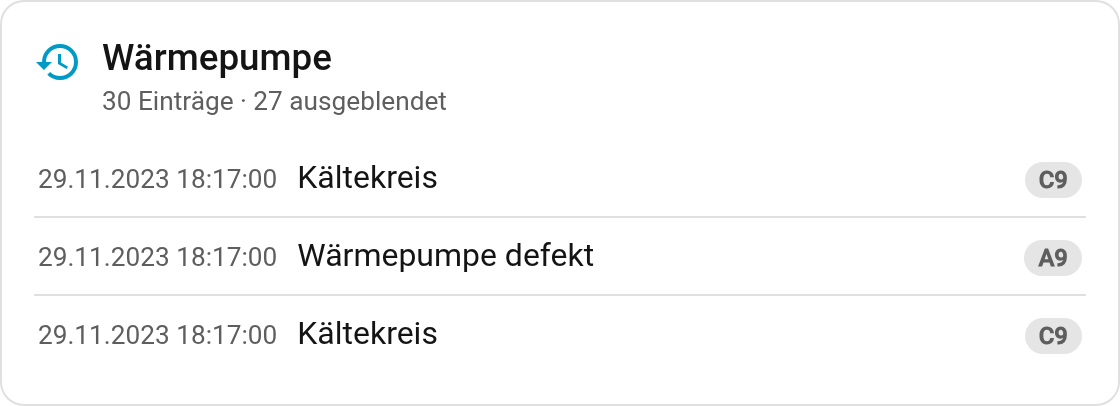
- Two dashboard cards, in the card picker with no manual setup: a weekly-programme editor and the controller's fault history with the fault texts of your controller family.
- The controller's clock kept in sync, its fault buffer decoded, its schedules readable and writable from cards, services and automations.
- Recovery without you: the integration reconnects when the ESP32 comes back and marks entities unavailable rather than stale when the controller stops answering.
| How it works | identification, the base entity set and tiers, bus budget, writing, clock, fault history, schedules |
| ESPHome configuration | the node, several ports, why the names in it matter |
| The catalog | building it, keeping several, changing it later, versioning |
| Options | every option, what a tier switch does to your own changes, entity ids |
| Dashboard cards | both cards with their YAML, names in your own cards |
| Services | the actions and how to address a programme |
| Protocols | P300, KW and its limits, GWG |
| Troubleshooting | the messages you may see and what they mean |
Bug reports with the log lines around the problem and the entity's address attribute are the
most useful thing; the integration entry has a Download diagnostics item that gathers the rest
without your addresses or keys. Reports from controllers other than the two confirmed so far are
especially welcome, whether they work or not:
open an issue.
OptoV was written together with AI coding assistants, Claude, Gemini and GPT among them, with a person directing the work, making the design decisions, and testing every part of it against a real controller. Some lines were typed by a human and many were drafted by a model; treat it as you would any other code, read it before you trust it, and report what is wrong.
MIT, see LICENSE. The licence covers this code. It does not cover the controller catalog, which is not part of this repository and which each user builds for themselves.