中文 | English
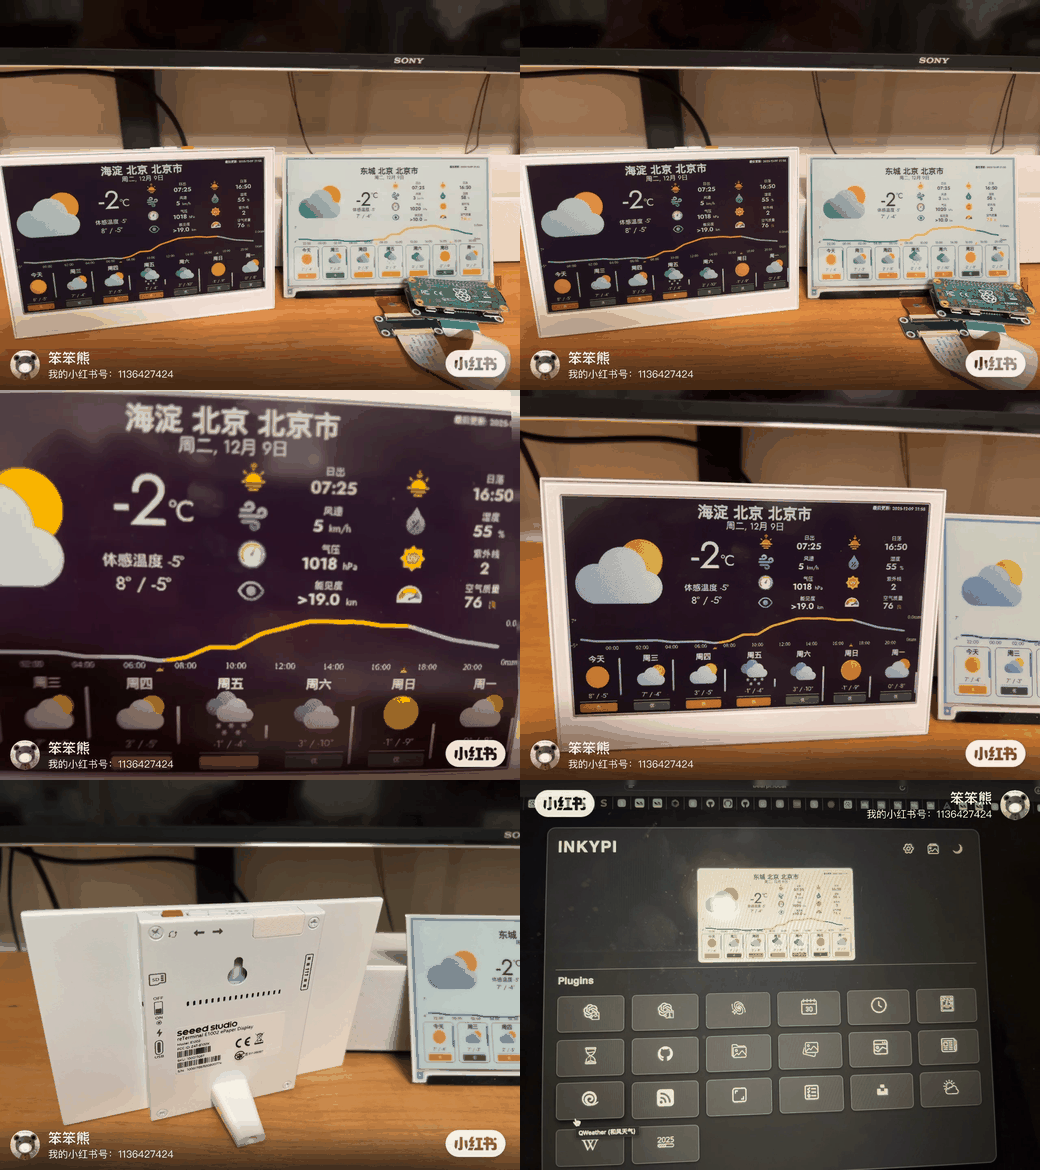
InkyPi-CN 是 fatihak/InkyPi 的中国本地化 fork,核心是 QWeather(和风天气)插件——以上游官方 weather 插件为基础深度改造扩展而来(约 1,700 行扩展至 4,700 行),专为国内墨水屏天气面板场景优化:
- QWeather(和风天气)插件:实时天气 + 24 小时逐时预报 + 7 日预报 + 分钟级降水(可选)+ 空气质量(AQI 彩色标签)+ 气象预警徽章(按严重程度排序,最多 4 条,超出显示“+N条预警”),支持中文/英文、浅色/深色/随日出日落自动切换
- 高德地图选点:设置页内置地图选点、IP 定位、默认位置,无需手工查经纬度
- 继承上游全部插件(时钟、日历、图片、AI 等)与 Web 管理界面
UI/视觉改动(相对上游 weather 插件的完整清单;标 ★ 的为上游完全没有的原创功能):
- ★ 天气预警徽章:等级配色(红/橙/黄/蓝)、严重度排序、智能去重、自动过滤已解除预警、最多 4 条 2×2 布局、超出显示“+N条预警”
- ★ 温度线日夜渐变:按日出日落自动黄(日)/蓝(夜)渐变,30 分钟过渡,Catmull-Rom 平滑,白描边防混色
- ★ 每日 AQI 彩色标签:七日预报每日空气质量标签(国标 6 级配色,当日实况+后续天气估算)
- ★ 纵向温度条:Apple 天气风格,全局温度范围标准化、渐变色、独立开关
- ★ 分钟级降水合并显示(前 2 小时 5 分钟精度)与 API 文件缓存(减少调用量)
- 其余优化:▲▼ 高低温配色箭头、体感/高低温字号层级、当前天气文字与风力格式修正、降水柱概率色阶+百分比轴+3 小时滑动平均平滑、日出日落图标上小时轴、七日整数像素等分布局(两端留白=列间距)、三种显示风格(默认 / Nothing Weather 像素风·待完善 / 和风官方 SVG 图标)、深色模式全链路适配、去边距全屏填充
和风天气 API Key:注册 和风天气开发者平台 获取,部署时填入(免费订阅即可用)。
上游的安装说明、硬件清单、插件开发文档见下文英文部分与 docs 目录。
InkyPi-CN is a China-localized fork of fatihak/InkyPi, centered on a QWeather plugin — deeply extended from the upstream weather plugin (~1,700 → ~4,700 lines): hourly/daily forecasts, AQI chips per day, severity-sorted weather alert badges, day/night gradient temperature line, Apple-style per-day temperature range bars, Amap location picker, and bilingual UI. Everything else from upstream (web UI, playlists, plugin ecosystem) is inherited.
InkyPi is an open-source, customizable E-Ink display powered by a Raspberry Pi. Designed for simplicity and flexibility, it allows you to effortlessly display the content you care about, with a simple web interface that makes setup and configuration effortless.
Features:
- Natural paper-like aethetic: crisp, minimalist visuals that are easy on the eyes, with no glare or backlight
- Web Interface allows you to update and configure the display from any device on your network
- Minimize distractions: no LEDS, noise, or notifications, just the content you care about
- Easy installation and configuration, perfect for beginners and makers alike
- Open source project allowing you to modify, customize, and create your own plugins
- Set up scheduled playlists to display different plugins at designated times
Plugins:
- Image Upload: Upload and display any image from your browser
- Daily Newspaper/Comic: Show daily comics and front pages of major newspapers from around the world
- Clock: Customizable clock faces for displaying time
- AI Image/Text: Generate images and dynamic text from prompts using OpenAI's models
- Weather: Display current weather conditions and multi-day forecasts with a customizable layout
- QWeather: Enhanced weather display with detailed forecasts, air quality, and multi-language support (中文/English)
- Calendar: Visualize your calendar from Google, Outlook, or Apple Calendar with customizable layouts
And additional plugins coming soon! For documentation on building custom plugins, see Building InkyPi Plugins.
- Raspberry Pi (4 | 3 | Zero 2 W)
- Recommended to get 40 pin Pre Soldered Header
- MicroSD Card (min 8 GB) like this one
- E-Ink Display:
- Inky Impression by Pimoroni
- Inky wHAT by Pimoroni
- Waveshare e-Paper Displays
- Spectra 6 (E6) Full Color 4 inch 7.3 inch 13.3 inch
- Black and White 7.5 inch 13.3 inch
- See Waveshare e-paper displays or visit their Amazon store for additional models. Note that some models like the IT8951 based displays are not supported. See later section on Waveshare e-Paper compatibilty for more information.
- Picture Frame or 3D Stand
- See community.md for 3D models, custom builds, and other submissions from the community
Disclosure: The links above are affiliate links. I may earn a commission from qualifying purchases made through them, at no extra cost to you, which helps maintain and develop this project.
To install InkyPi, follow these steps:
-
Clone the repository:
git clone https://github.com/guanbear/InkyPi-CN.git
-
Navigate to the project directory:
cd InkyPi-CN -
Run the installation script with sudo:
sudo bash install/install.sh [-W <waveshare device model>]
Option:
- -W <waveshare device model> - specify this parameter ONLY if installing for a Waveshare display. After the -W option specify the Waveshare device model e.g. epd7in3f.
e.g. for Inky displays use:
sudo bash install/install.sh
and for Waveshare displays use:
sudo bash install/install.sh -W epd7in3f
After the installation is complete, the script will prompt you to reboot your Raspberry Pi. Once rebooted, the display will update to show the InkyPi splash screen.
Note:
- The installation script requires sudo privileges to install and run the service. We recommend starting with a fresh installation of Raspberry Pi OS to avoid potential conflicts with existing software or configurations.
- The installation process will automatically enable the required SPI and I2C interfaces on your Raspberry Pi.
For more details, including instructions on how to image your microSD with Raspberry Pi OS, refer to installation.md. You can also checkout this YouTube tutorial.
To update your InkyPi with the latest code changes, follow these steps:
- Navigate to the project directory:
cd InkyPi - Fetch the latest changes from the repository:
git pull
- Run the update script with sudo:
sudo bash install/update.sh
This process ensures that any new updates, including code changes and additional dependencies, are properly applied without requiring a full reinstallation.
To install InkyPi, simply run the following command:
sudo bash install/uninstall.shThe InkyPi project is constantly evolving, with many exciting features and improvements planned for the future.
- Plugins, plugins, plugins
- Modular layouts to mix and match plugins
- Support for buttons with customizable action bindings
- Improved Web UI on mobile devices
Check out the public trello board to explore upcoming features and vote on what you'd like to see next!
Waveshare offers a range of e-Paper displays, similar to the Inky screens from Pimoroni, but with slightly different requirements. While Inky displays auto-configure via the inky Python library, Waveshare displays require model-specific drivers from their Python EPD library.
This project has been tested with several Waveshare models. Displays based on the IT8951 controller are not supported, and screens smaller than 4 inches are not recommended due to limited resolution.
If your display model has a corresponding driver in the link above, it’s likely to be compatible. When running the installation script, use the -W option to specify your display model (without the .py extension). The script will automatically fetch and install the correct driver.
Distributed under the GPL 3.0 License, see LICENSE for more information.
This project includes fonts and icons with separate licensing and attribution requirements. See Attribution for details.
Check out the troubleshooting guide. If you're still having trouble, feel free to create an issue on the GitHub Issues page.
If you're using a Pi Zero W, note that there are known issues during the installation process. See Known Issues during Pi Zero W Installation section in the troubleshooting guide for additional details..
InkyPi is maintained and developed with the help of sponsors. If you enjoy the project or find it useful, consider supporting its continued development.



Check out these similar projects:
- PaperPi - awesome project that supports waveshare devices
- shoutout to @txoof for assisting with InkyPi's installation process
- InkyCal - has modular plugins for building custom dashboards
- PiInk - inspiration behind InkyPi's flask web ui
- rpi_weather_display - alternative eink weather dashboard with advanced power effiency